digiblur

After searching through many mmWave sensors, some bad, some great, some expensive, I've landed on the LD1125G. An inexpensive sensor and stupid quick! In the video below I cover the testing process, building and installing open source ESPHome software on the ESP32. No cloud, no additional apps, and 100% local.

The use of a PIR has plagued my bathrooms from time to time with lights going out too early based on various activities in the bathroom. One cheat I did was to use the humidity sensor that drives the fan to force the light to be on when the humidity is high. This has worked well for the most part but I've been looking to fix the pain point in the smart home world for quite some time. I've finally found a sensor that works quick, easy to install and use. This has unlocked various new automations for the bathroom such as; turn on the vent if someone is in the bathroom for more than a minute or two, turn off the light once the person leaves and still allow the vent to run to pull down the humidity. Fully automating the light and fan in the bathroom may sound silly to some individuals but it is the thing that makes the home a true Smart Home and not use a remote controlled one.

Full Video

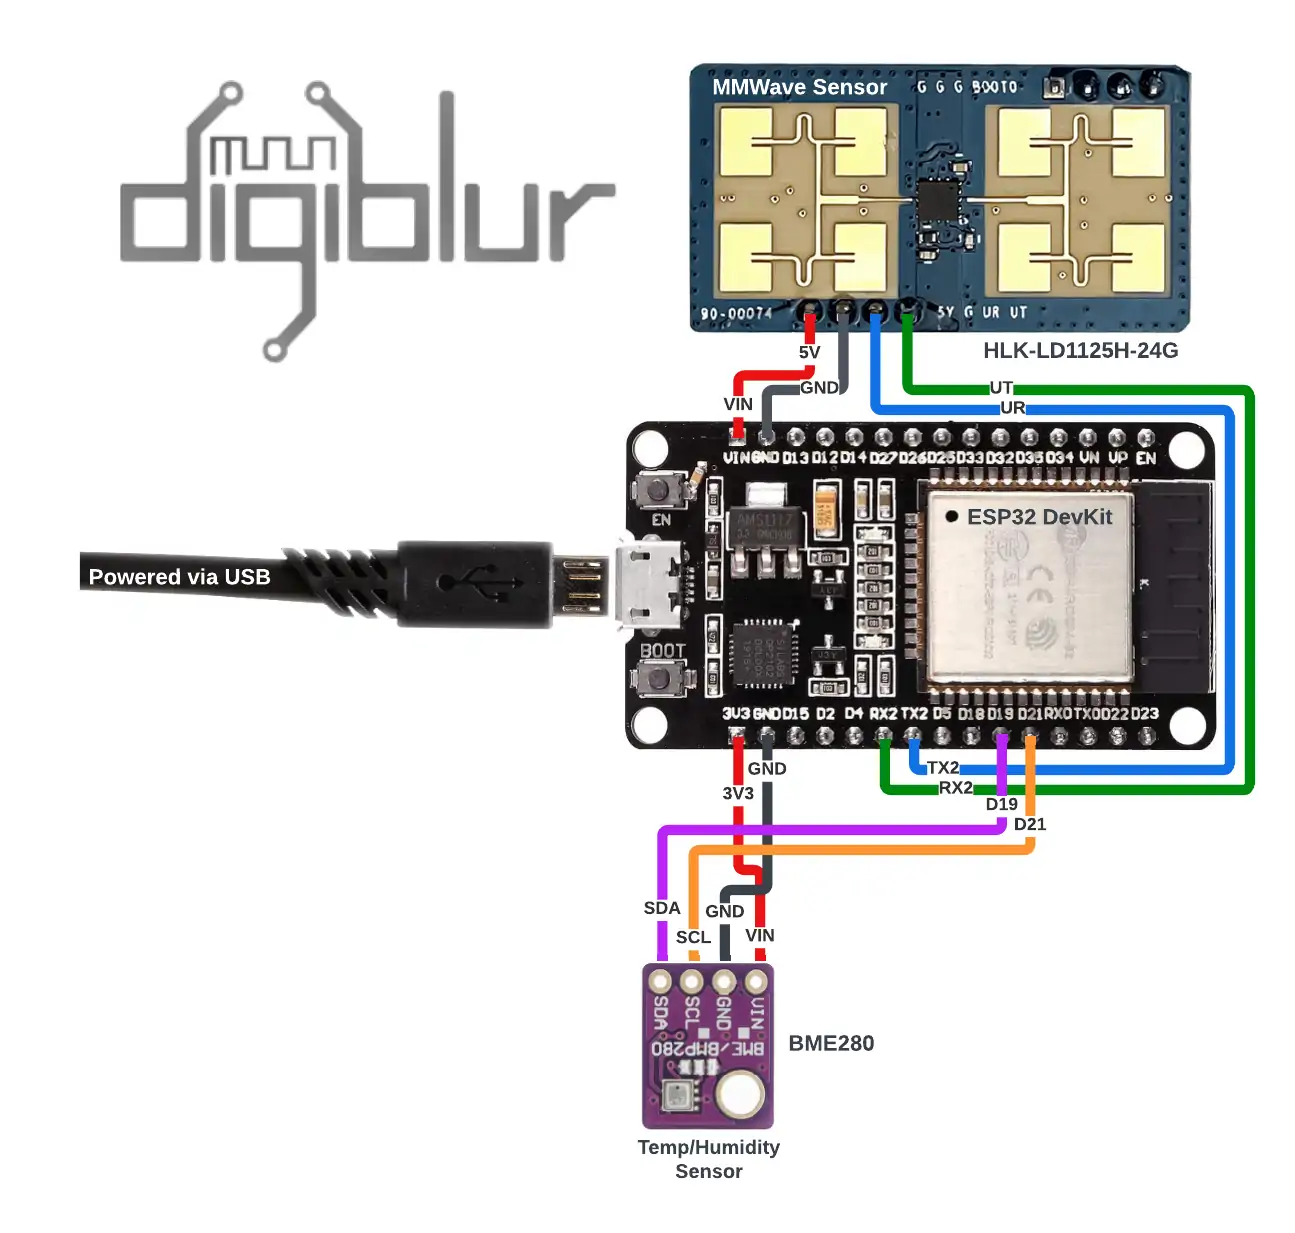
Wiring Diagram

alt text

Thanks Caleb for the awesome diagram! For a power source, I'm currently using a 5VDC power supply in my attic that powers many ESP based projects around the house in the walls, ceiling, etc.

What do you need?

*Affiliate Links

  1. mmWave LD1125G - Make sure to choose HLK-LD1125H-24G! or Aliexpress #2
  2. ESP32 NodeMCU Dev Board or ESP32 NodeMCU Dev Board
  3. 2.0mm to 2.54mm Pitch Female to Female Jumpers
  4. Optional BME280
  5. Optional USB Screw Terminals
  6. 5VDC Power Source

Read more 👉

digiblur

***UPDATE 05/28/2023 - LibreTuya renamed to LibreTiny

Remember the days of Tuya-Convert where you could obtain a Tuya based Wi-Fi Smart device, run a quick exploit via a Raspberry-Pi and load your own copy of Tasmota or ESPHome firmware right on the device? Things were patched unfortunately and then later the chipsets were changed to a Beken based chipset that wouldn't run Tasmota at all. So we resorted to chip swapping with hot air guns, soldering etc to get our favorite local non-cloud firmware on the device. Things are now going full circle again where we can load firmware on the Beken chipsets with an over the air exploit called tuya-cloudcutter It is such an awesome process and down right addictive!. Then the bigger accomplishment is the LibreTiny project has it all working with ESPHome! No additional firmware to learn especially for the ESPHome folks. It all integrates with Home Assistant like any other ESPHome device does.

What do you need?

First a device that is Beken based and on the list of exploitable devices with tuya-cloudcutter (more are being added all the time!). In this example I'm using the Globe Motion NightLight Plug Second a laptop, NUC, PC, etc or Raspberry-Pi to run the exploit and also load the ESPHome firmware.

The instructions below are based on using a Raspberry-Pi, if you are using a different computer you will need to adapt by using a different OS flavor but the concept is all the same. If you are more of a full-video type of person and want the complete walk through view the video below.

Full Video

Read more 👉
digiblur

Testing 24 different sensors with temperature and humidity in various environments from the refrigerator, freezer, room temperature, outside, and even the shower for the ultimate humidity test. I've included several Grafana graphs to help determine your BEST sensor for the environment and use case you have.

Full Video

Sensors Specs

Click Open in New Tab for larger images

Read more 👉

digiblur

Koenkk, the great mastermind behind Zigbee2MQTT and the Z-Stack firmware that runs on the various Zigbee Coordinators, has released a new updated firmware for the CC2652/CC1352 series chipsets. This firmware is for both Zigbee2MQTT and Home Assistant ZHA users. The changelog is as follows:

This update includes the various Ti based coordinators such as the Sonoff Dongle-P, Athom USB/Ethernet, Tubes USB/Ethernet, Zigstar, Electrolama, and others.

Should I upgrade?

The old saying of if isn't broke then don't fix it definitely applies here for the average Zigbee network sizes. I have a mixture of various Zigbee devices of around 50 devices and I've been running this firmware in beta for a few weeks without any issues. I'm using a CC2652P2 based Sonoff Dongle-P USB coordinator with Zigbee2MQTT. Several Home Assistant ZHA users on the Github testing thread have also reported no issues during the beta period. Give it a whirl if you want to, you can always downgrade if you think it is causing issues.

How do I upgrade?

Would you like a video to help walkthrough the processes? If not, skip the video and Jump to the - digiblurDIY How to Upgrade Zigbee Coordinators Page

digiblur

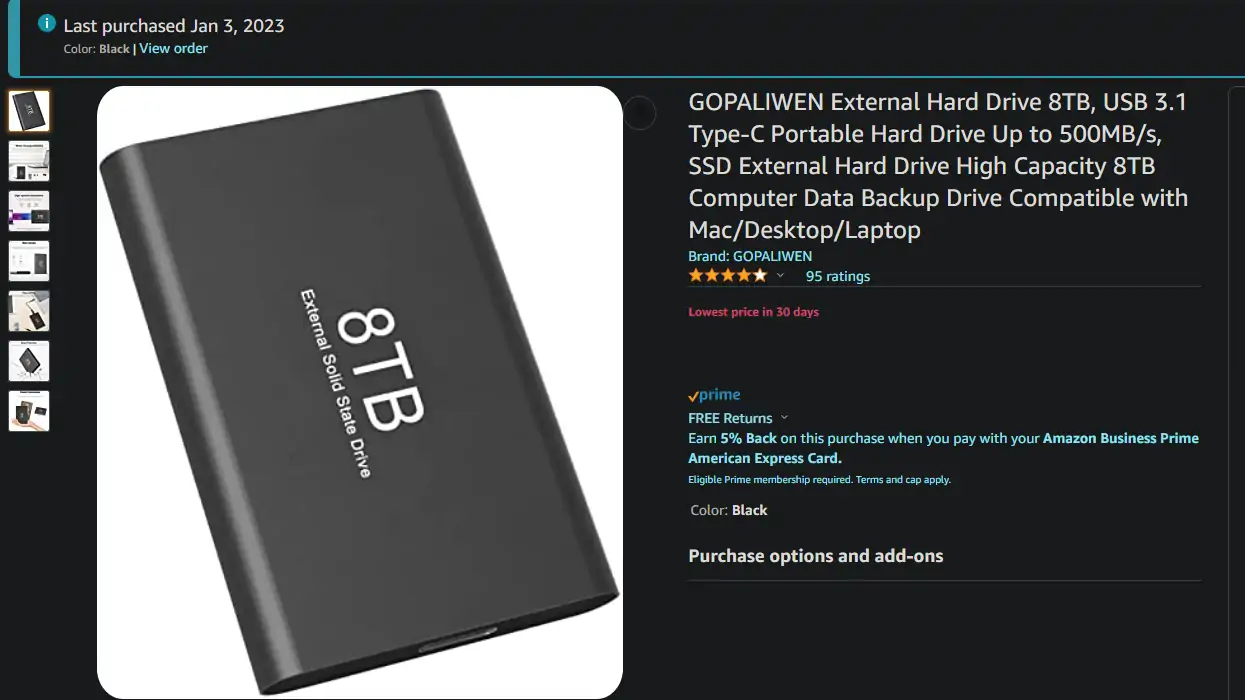
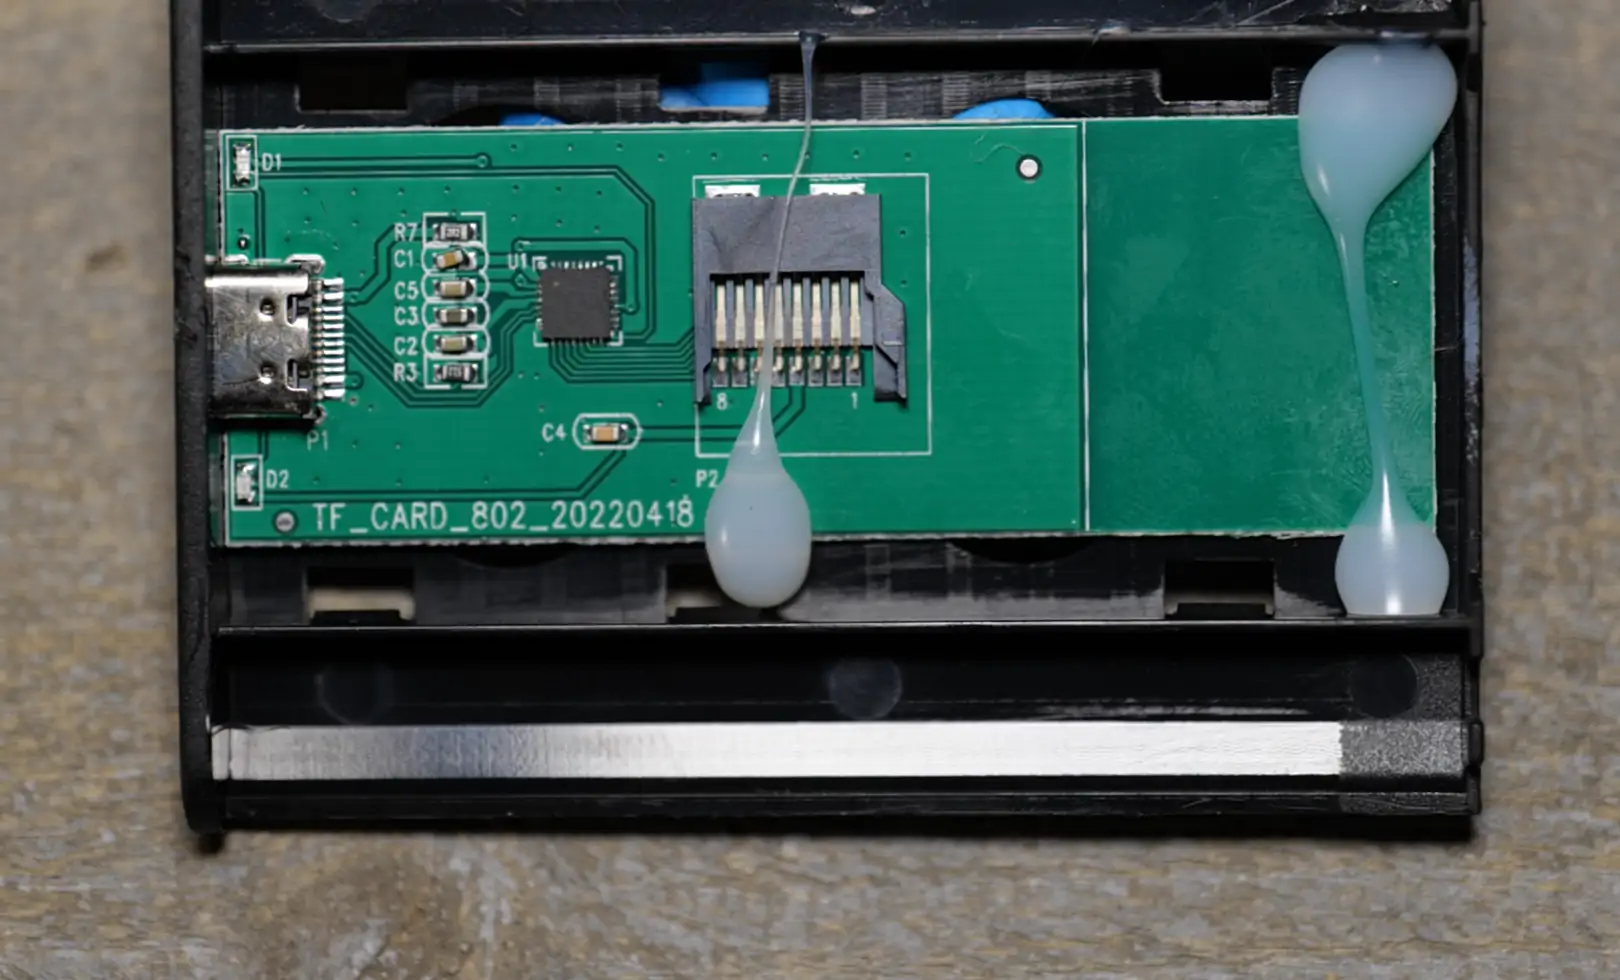
When things are too good to be true they probably are! Just like the old scams of the knock-off 1TB SD cards but this one is a little different take on it. The whole scam is for someone to buy these, throw a few files on them and wait for the ticking time bomb to hit later much later after the return period expired. They are advertised as 8TB or 16TB drives when they are simply 64GB cheapo micro SD cards inside. See the digiblurDIY video below

Spread the word to friends & family members, turn in these sellers, etc with these scammers whenever you can. The GOPALIWEN Amazon Listing below was luckily removed shortly after the video published. It is simple to pick them out based on just scanning for the large drives with cheap prices. Stick to the major brands such as Samsung, Sandisk, Wester Digital, Crucial, etc., and price them appropriately. If they are too cheap, don't buy them! Be sure to always test and check out your drives before the return period expires no matter the brand.

alt text

Pics / Still Frames

alt text Read more 👉

digiblur

Reolink has released their doorbell cameras finally! digiblur DIY Video below or scroll past if you simply want to see frames from the camera itself and skip the video.

Purchase from Reolink - Wi-Fi or PoE (Power over Ethernet)
Purchase from Amazon

It is available in two flavors. PoE and Wi-Fi directly from Reolink.com. The doorbell camera comes with an external wireless chime that is power via a normal wall receptacle in the home. The home automation DIY'ers can also pick up this signal via 433mhz receivers for automation fun as well. If you have the Reolink NVR this camera integrates right into the system but if not you can also use the on-board micro SD card for recordings.

Does it support RTSP/ONVIF? Can I use it with Blue Iris or Frigate? Kinda sort of not really! As of this current firmware the RTSP codec has typical Reolink issues with dropped frames. The video looks jerky but does work. I'm still hoping for Reolink to fix their various codec issues in there cameras but they still can't seem to get that part right.

Pics / Still Frames

alt text Read more 👉

digiblur

As of Home Assistant 2022.12 you are now REQUIRED to change any of your manual MQTT configs in the Configuration YAML file. Any devices that are using Auto Discovery or other automatic integrations are not impacted by this change. I've covered some of the changes and how I edit things in the video linked below. I also included two before and after configs below to see the necessary changes.

Before

light:
- platform: mqtt
name: "Sink Light"
state_topic: "tele/SinkDimmer/STATE"
state_value_template: "{{ value_json.POWER }}"
command_topic: "cmnd/SinkDimmer/POWER"
availability_topic: "tele/SinkDimmer/LWT"
brightness_state_topic: "tele/SinkDimmer/STATE"
brightness_command_topic: "cmnd/SinkDimmer/Dimmer"
brightness_scale: 100
brightness_value_template: "{{ value_json.Dimmer }}"
qos: 2
payload_on: "ON"
payload_off: "OFF"
payload_available: "Online"
payload_not_available: "Offline"

After